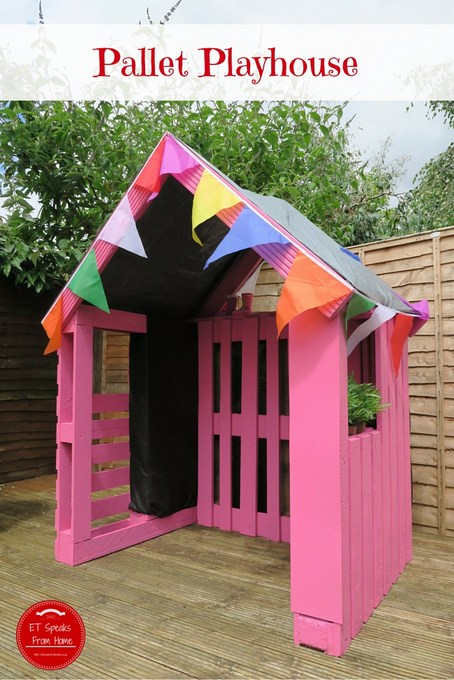
Want to learn how to build a Pallet Playhouse step by step? This is my second pallet project and I have loved the challenge of building this! After building the pallet climbing frame, my daughter wanted me to build her a playhouse. It has always been her dream to have a playhouse in the garden. So I decided to put the leftover pallets to good use.

I selected the best pallets and ruled out those in weird shapes and sizes. To build this house, I used just three pallets for the frame and the rest was decking. Initially I thought about using two more pallets to build the roof, however it was too heavy for me to install this all by myself. I opted for a simple and light roof. I am not sure how long the roof will last but for now, it is perfect.
In order to do this project, I used the Impact Driver R18ID3-0 (to drive screws into the wood), Circular Saw R18CS-0 (cutting up wood) and Corner Palm Sander R18PS-0 (sanding wood surfaces).

Materials required:
- 3 solid pallets
- 2 decking planks (around 3 metre long)
- Decking/outdoor screws & nails
- Wood glue (outdoor)
- Shed paint & brush
- Ground sheet for roof
- Cloth to cover the pallets
Beside these materials listed above, you will need a measuring tape, metal ruler, marker pen, drill & screw bits, hammer, jig saw and protective sheets.
Method:
- To make the C frame, connect all three pallets together using decking screws. Before I could screw them together, I had to cut two pieces of wood to place on each side of the pallets. This helped to place all the pallets together.


- Use a saw to cut a long piece of decking to connect the side of the C frame. See the photo.

- To make the windows, if you like, you need to use a jig saw to saw the pallets to create the windows. Do not throw any cut pieces of pallet wood away. Instead, keep them to make shelves. For example, see where I placed the accessories and flowers.

- To make the roof, measure and cut the decking into four pieces. Connect two decking together to make a V shape. Used the leftover wood to secure the decking roof using the nails and decking screws together. For additional piece of mind, I also used the wood glue to glue both pieces together. Now place the roof on the side of the pallets.


- Use the sander to sand down any rough surface areas, then paint it! This took me over 2 hours to fully paint the frame!

- Use the sheets/wood to cover any unsightly areas. I have a piece of plywood that I used to seal the side of the pallet.

- For the roof, I used the ground sheet as it is lightweight and cheap. If you are using other materials, you would probably need to place more wood across the roof to ensure the materials did not collapse on the roof. I used nails to secure the ground sheet.
This is a straightforward project that I did all by myself. Due to the bad weather, I had to split the job into four days. Each time, I did a bit of work, it rained. Typical British weather! Overall it took me over 8 hours from start to finish.


Watch this video to find out more on how I made it! https://youtu.be/ibHXaHujIws
Here are the links of the Ryobi tools from Amazon:
- Impact Driver R18ID3-0
- Brushless Percussion Drill R18PDBL-0
- Circular Saw R18CS-0
- Corner Palm Sander R18PS-0
- Fast charger BCL1418H
- 2.5Ah and 5.0Ah Lithium batteries
Disclosure: We received the samples for the purposes of writing this review and do the DIY, however all thoughts and opinions remain our own. We have included Amazon affiliate links to the products. If you click on this and buy, we may earn a small commission.
Fantastic idea I love it, certainly a lot cheaper than shop bought playhouses
I absolutely love this idea! So simple yet so effective, I’m sure my little niece would love her own!
Oh wow! Well done you! That looks fantastic! What a great use for pallets. Such a clever idea x
Thi s looks fantastic, well done for doing this on your own! I bet your daughter loves her new play house!