This December, OXO Good Grips set bloggers an ultimate Christmas challenge to bake a gingerbread house, letting our imagination run wild with all the possible ways we can decorate it. They have also teamed up with Stork to provide us this challenge. We have received a baking bundle including Stork margarine, OXO’s new bakers 8 piece silicone decorating set, compact food scale, measuring spoon set, 11” whisk and a medium silicone spatula.
Last year when I tried to bake my gingerbread house, the whole house collapsed with cookies breaking off as I didn’t have the proper tools and maybe because I used too thin icing. So this year, I am challenging myself again to make a house that won’t crumble!

This is my Christmas Gingerbread House which took me 4 days to make. The reasons are due to restrict daytime and also allowing the icing to dry before putting them together. This is not an easy bake and do remember to err on the side of caution and bake more than not enough!

To make a gingerbread house, besides those baking tools listed above, you will also need:
- A big base for your house
- Gingerbread house’s template x2 (easily downloadable from a website) or plastic template (from shop)
- Christmas cookie cutters in various size
These are the four steps to make a gingerbread house:
- Baking
- Icing
- Piping
- Build
Step 1: BAKE
Firstly, you have to bake your gingerbread cookies. This is a recipe I used to make stained glass window cookies. I just made a few adjustments.
Ingredients:
- 450g plain flour, sifted plus extra for dusting
- 175g caster sugar / brown sugar
- 100g Stork butter, softened
- 1 teaspoon bicarbonate of soda
- 4 tablespoon golden syrup
- 1 large egg
- 1 tablespoon ground ginger
- Boiled sweet for glass window if you want one
The measuring spoons come with a scraper cum hanger. The spoons are detachable by pulling them off the top which require a bit of strength to pull apart. The colour-coding on the spoons are easy to read.
 The compact food scale (up to 500g) is very easy to use and comes with two readings: either grams or oz. I do find it hard to measure flour though as the bowl is too shallow. It would definitely be great for measuring fruits etc.
Method:
- Mix plain flour, ground ginger and bicarbonate of soda into a large bowl, add the butter and rub it in until the mixture resembles breadcrumbs. Stir in the sugar.
- Place the egg and golden syrup in a separate bowl and whisk together.
- Mix both mixtures together to form a smooth dough.
- Roll the dough onto a floured work surface and use a gingerbread house template and variety of floured cookie cutters to cut out the shapes.
- If you have a window on your house, fill the holes with the chopped sweets.

- Bake in the preheated oven at 160°C for 10 minutes. Normally the cookies expand slightly bigger or in an odd shape. So take the gingerbread house (roof x2, front x2 and side x2) out and place the clean template on it. Use the template to cut around the edge. Put the cookies back into the oven and bake for another 5 minutes to ensure it is cook and harden.
- Leave the cookies to cool on the baking sheets.
Step 2: ICING
Ingredients:
- 115g icing sugar
- 2 tablespoon lemon juice / 1 tablespoon water
- Food colour gels
- Decoration: marshmallow, chocolate & coloured sprinkles, edible silver balls, candy etc.
Method:
- Mix the icing sugar, lemon juice/water and colour gels until it is slightly wet.
- Dip the surface of the cookies into the icing and place the decoration on it. Allow it to dry overnight.
- To make the Christmas star tree: I used a circle cookie as the base, then used thick icing to glue the stars on it. Finish it by piping the icing on top.
Step 3: PIPING
I used the OXO 8 pieces silicon set to decorate the house. This set comes with two piping bottles and 6 different nozzles. This is what you can achieve using the nozzles provided.
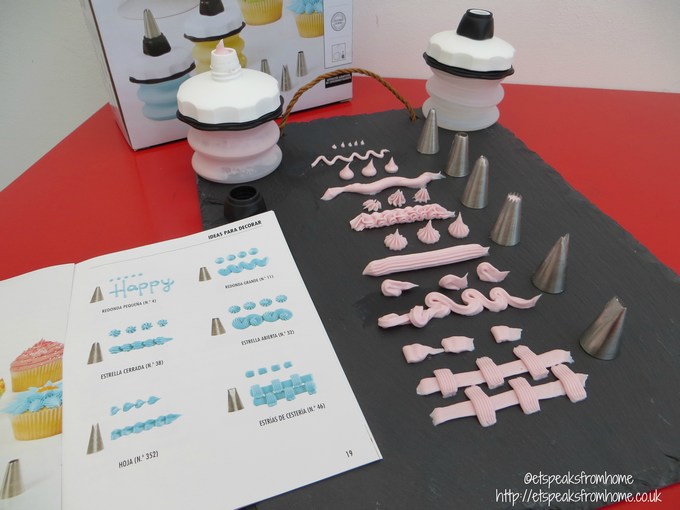
They are very easy to use and clean. I love that the silicon bottle is so flexible that I can turn it inside out to wash and dry it. Also changing the nozzle in between each design is so easy.
Pipe around the house and decorate it. Then allow it to dry overnight.
Step 4: BUILD
Method:
- Make slightly thicker icing by using less water etc. Pipe the base of the front cookies, followed by the side cookies and make sure the cookies stick together.
- Then place the roofs and pipe around it.
- Next place your festive cookies on the display base. Cut the bottom of the cookies for a flatter surface if necessary. Place the icing at the base of the cookies and stick it on the display base.
- Then dust the display with icing sugar for a snowy effect using the OXO Baker’s dusting wand.
This is how I built my Christmas Gingerbread house!


Disclosure: We have received the samples for the purposes of writing this review, however, all thoughts and opinions remain our own.
Wow this looks really professional – the colours bring it to life. Thanks for joining in with #FoodieFriday x
Just incredible lady, I think I might need to buy one though as I’ve left it pretty late! Thanks for linking up to #tastytuesdays
That is amazing! I would love to have a go at making my own.
Wow, that looks amazing Eileen! Suitably jealous 😉 #pintorials
This looks gorgeous, much more professional looking than the one we made last year!
It’s beautiful, Eileen! Not sure I could match it, even with your superb tutorial 🙂
Well done! It looks amazing. I made one using a kit last year but would like to try my own
Wow! This looks amazing! How long it took to put it all together?
I think it looks amazing!! Wish I had the time to spend doing that, love all the oxo accessories too, I really want one of those oxo bowls!!